Getting the nail count right matters more than most homeowners realize. Too few nails can lead to shingle blow-offs during Michigan’s high winds, while improper nail placement can void manufacturer warranties, cause leaks, and shorten the life of your roof.
This guide explains standard roofing nail counts, proper nailing patterns, and when it makes sense to let a professional handle installation to avoid costly mistakes. For a full system-level view, see our roofing services hub.
What Does “Per Square” Mean in Roofing?
In roofing terms, one square equals 100 square feet of roof surface.
Shingles are typically sold in bundles, and most asphalt shingles require:
- 3 bundles per square (standard 3-tab shingles)
- Some architectural shingles may require more depending on thickness
The number of nails needed per square depends on:
- Shingle type
- Nailing pattern
- Local wind and code requirements
If you’re estimating materials, this guide pairs well with how to measure for roofing shingles.
Standard Roofing Nail Counts by Shingle Type
Below are general guidelines used by most manufacturers. Always verify the exact requirements for your specific shingle brand.
3-Tab Asphalt Shingles
- 4 nails per shingle (standard)
- ~320 nails per square
Architectural / Dimensional Shingles
- 4–6 nails per shingle
- ~320–480 nails per square, depending on pattern
High-Wind or Steep-Slope Roofs
- 6 nails per shingle
- Higher nail counts improve wind resistance and uplift protection
⚠️ Always follow the manufacturer’s installation instructions — not generic rules — to preserve warranty coverage. If warranties are important to you, review things you should know about your roofing warranty.
4-Nail vs 6-Nail Patterns: When Each Is Required
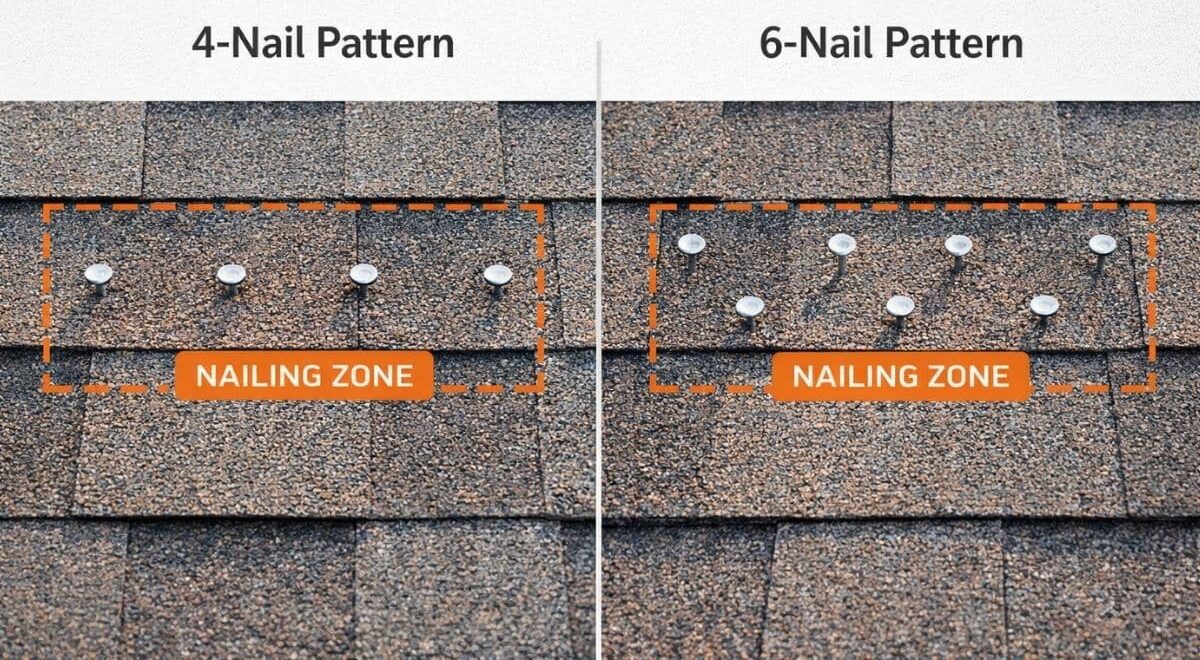
Nail count alone isn’t enough — placement matters just as much.
4-Nail Pattern (Standard Conditions)
Typically acceptable when:
- Roof slope is standard
- Wind exposure is moderate
- Manufacturer allows it
- Local code permits
6-Nail Pattern (High-Wind Protection)
Often required when:
- Roof is in a high-wind zone
- Shingles are rated for enhanced wind warranties
- Roof pitch is steep
- Manufacturer specifies it for warranty coverage
In Michigan, many roofing contractors default to 6-nail patterns for added protection, even when codes don’t strictly require it — especially after repeated storm damage roof inspections reveal blow-offs caused by under-fastening.
Why Proper Nail Placement Matters
Improper nail placement can cause:
- Shingles to lift or tear
- Water intrusion beneath shingles
- Granule loss and premature aging
- Failed inspections
- Voided warranties
Correct nails must be:
- Driven straight (not angled)
- Flush with the shingle (not overdriven or underdriven)
- Placed in the manufacturer’s designated nailing zone
Even with the correct number of nails, poor placement can lead to early roof failure. If leaks result, this guide on expert roof leak repair in Michigan is helpful context.
Common DIY Mistakes That Cause Shingle Failure

Many roofing problems stem from well-intentioned DIY installs. Common mistakes include:
- Using too few nails
- Nailing outside the reinforced nailing zone
- Overdriving nails through shingles
- Using the wrong nail length
- Reusing old fasteners
- Inconsistent nailing patterns
- Skipping additional nails in high-wind areas
These mistakes often don’t show problems immediately — but they dramatically increase the risk of shingle blow-off during storms (see causes here).
Code & Warranty Considerations in Storm Zones
This is where many homeowners get caught off guard.
Manufacturer Warranties
Most shingle warranties require:
- Correct nail count
- Proper nail placement
- Approved fasteners
- Installation per manufacturer specs
Failure to meet these requirements can void coverage, even if shingles are brand new.
Local Building Codes
Codes may:
- Require increased nail counts in wind-prone areas
- Mandate specific fastening methods
- Reject installs that don’t meet manufacturer instructions
Insurance companies may also deny claims if damage is linked to improper installation. If insurance is involved, start with insurance roofing repairs.
How Professionals Handle Nailing Correctly
Professional roofers:
- Follow manufacturer-specific nailing guides
- Adjust nail patterns based on slope and exposure
- Use correct nail length for decking thickness
- Inspect decking before fastening (see roof sheathing thickness)
- Document installation for warranty compliance
This system-based approach is one reason professionally installed roofs perform better during Michigan storms.
Should You DIY or Call a Pro?
DIY shingle installation may make sense if:
- It’s a very small repair
- You fully understand manufacturer specs
- Wind exposure is minimal
Professional installation is strongly recommended if:
- You’re replacing the entire roof
- Wind or storm resistance matters
- Warranty protection is important
- Insurance coverage is involved
If you’re unsure what condition your roof is actually in, this overview of what happens during roof inspections explains the process.
Final Thoughts: Nail Placement Protects More Than Shingles
Roofing nails are small — but they play a massive role in protecting your home.
Using the right number of nails, in the right place, with the right pattern, is what separates a roof that lasts from one that fails early.
Installing shingles? Nail placement matters as much as nail count.
AllPoint Construction offers free roof inspections to confirm shingle condition, fastening issues, and warranty-safe repairs.
📞 Call (734) 407-7110
📍 Serving Downriver & Metro Detroit — view our service areas (including Allen Park and nearby communities)
📅 Schedule your free roof inspection via our Contact Us page